
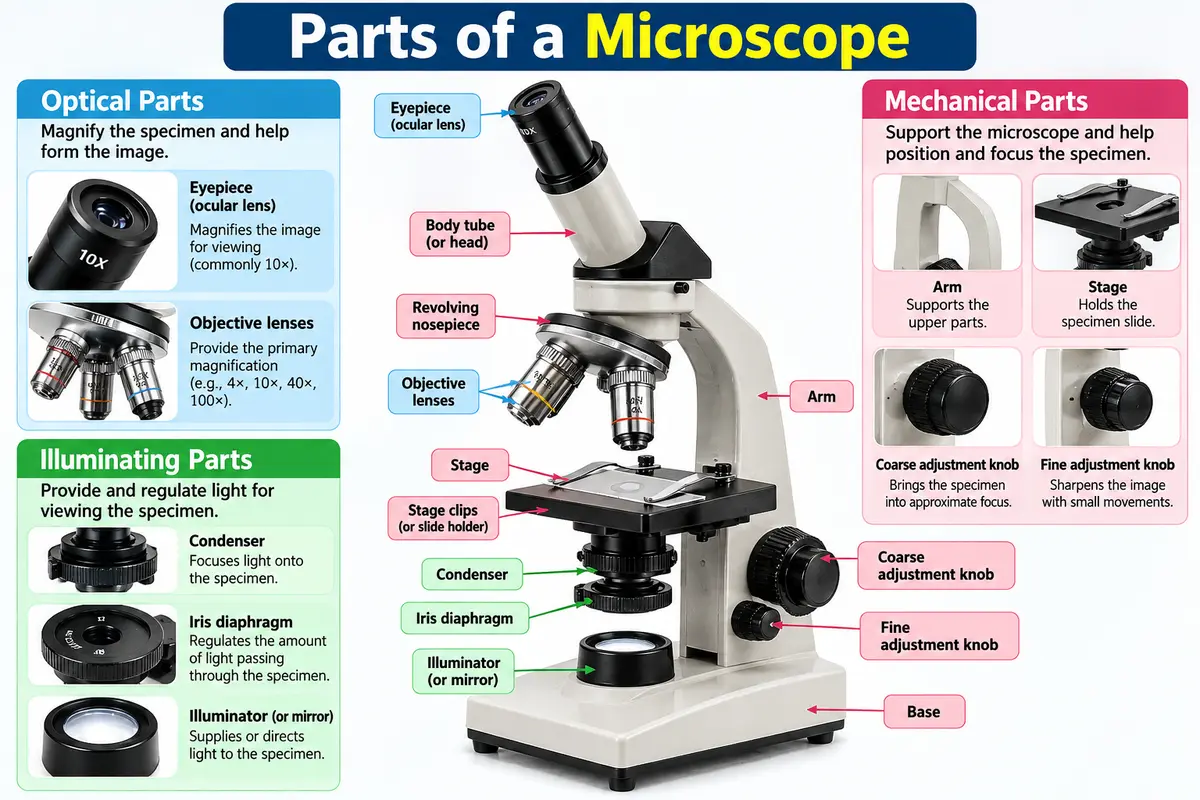
Learn: What are the parts of the microscope? and their functions with a detailed table, labeled diagram guide, magnification formula, and essential laboratory tips.
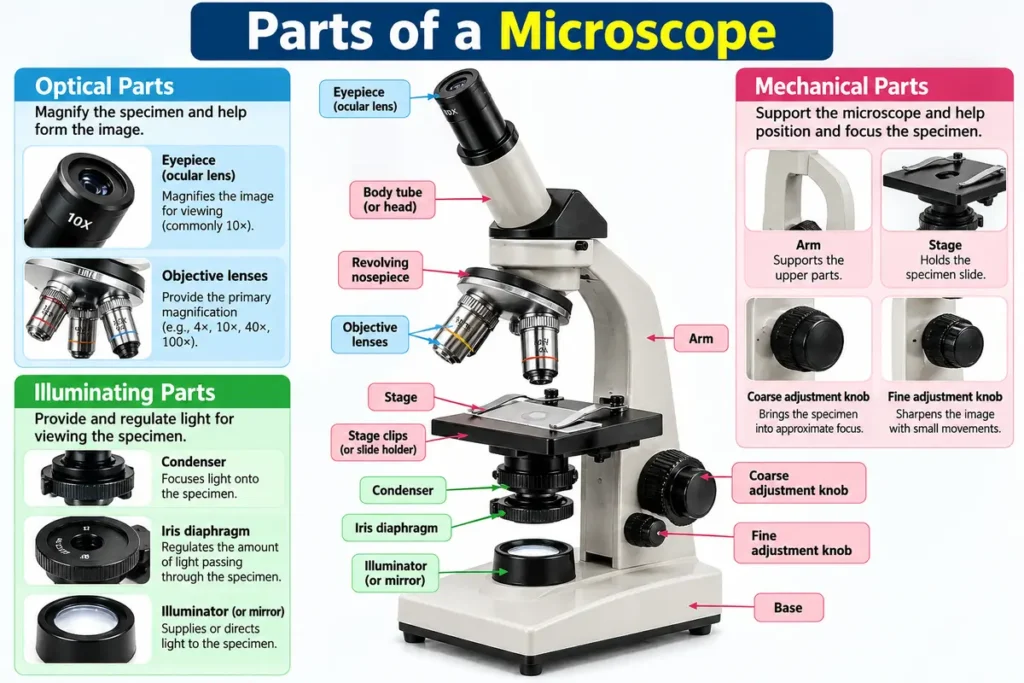
What Are the Parts of the Microscope?
A microscope is a scientific instrument that lets us see objects that are too small to be seen clearly with the naked eye. The microscope is widely used in biology, microbiology, medical laboratories, biotechnology, and scientific research. With a microscope we study cells, tissues, microorganisms, and other microscopic structures.
A compound light microscope works by using a system of lenses and controlled illumination to produce a magnified image of a specimen. To use the compound light microscope correctly, it is important to understand the names, locations, and functions of the components.
The parts of a compound microscope can be divided into three main groups:
- Optical parts: Magnify the specimen and help form the image.
- Mechanical parts: Support the instrument and help position and focus the specimen.
- Illuminating parts: Provide and regulate the light required to view the specimen.
List of the Main Parts of a Microscope
The following table provides a quick overview of the major parts of a standard compound light microscope.
1. Optical Parts of a Microscope
Optical components are responsible for magnifying the specimen and transmitting the image to the observer.
Eyepiece or Ocular Lens
The eyepiece is the lens that sits at the top of the microscope. That is where the user looks to see the specimen. The eyepiece normally gives a 10X magnification. The main job of the eyepiece is to enlarge the picture that the objective lens makes. This makes it easier to see structures under the microscope.
The curved upper part of the arm holds the body assembly to which one or more eyepieces (oculars). The eyepiece is the part of the microscope through which we look at the specimen.
Objective Lenses
Objective lenses are placed near the specimen. They give magnification and are very important for seeing small details in cells, tissues, and tiny organisms like bacteria. You often find lenses with magnifications of 4×, 10×, 40×, and 100× oil immersion. The exact lenses you can use depend on the microscope model.
Body Tube or Microscope Head
The body tube or head holds and aligns the components between the objective lenses and the eyepiece. The body tube keeps the pathway correct for image formation. In microscopes the head is often integrated instead of a simple straight body tube.
Revolving Nosepiece
The spinning part at the front is the piece that holds the lenses you look through. When you turn it, you can pick a lens and change how much you see. The lens you choose needs to snap into place before you start looking through it.
2. Mechanical Parts of a Microscope
Mechanical components provide stability, support the specimen, and allow the user to adjust the instrument.
Stage
The stage is a platform where the microscope slide sits. The stage has an opening that lets light pass through the specimen. The stage makes the specimen easier to see. The stage helps the user focus on the specimen. When the microscope slide is properly positioned, the user can. Observe the required area. The microscope slide, in the position guide, directs the user to the area they need.
Stage Clips or Slide Holder
Stage clips hold the slide securely on a basic microscope. On microscopes with a mechanical stage, a slide holder performs this function and allows more controlled movement.
Mechanical Stage Controls
These knobs move the slide horizontally and vertically across the stage. They help the user examine different areas of a specimen without removing the slide.
Coarse Adjustment Knob
The coarse adjustment knob moves the stage or optical assembly in steps depending on the microscope design. The coarse adjustment knob is normally used to find the specimen and to bring it into focus when the power is low.
Fine Adjustment Knob
The fine adjustment knob makes small, precise focusing movements to sharpen the image. It is particularly useful under higher magnification, where even a small adjustment can improve image clarity.
Arm
The arm holds up the body of the microscope and links it to the base. The arm is also a part of the instrument’s frame. When carrying a microscope, hold the arm with one hand. Support the base with the other hand. I always keep this rule in mind when I move a microscope.
Base
The base is the bottom part of the microscope. It provides stability and, in many modern models, houses the built-in illuminator and associated electrical components.
Illuminating Parts of a Microscope
Illumination components provide and control the light needed to observe a specimen clearly.
Illuminator or Mirror
The light source helps you see the sample clearly. Most modern microscopes have an LED or some kind of built-in light. Some older microscopes or simpler ones use a mirror to bring light from outside through the sample.
Condenser
The condenser sits below the stage. It takes light. Makes it focused on the sample, which helps create a clearly lit picture. Getting the condenser right is very important when looking at parts, with stronger magnification.
Iris Diaphragm
The iris diaphragm controls how light and the angle of light pass through the specimen. Adjusting the iris diaphragm helps balance image brightness and contrast. Opening the iris diaphragm fully does not always give the image; the right iris diaphragm setting depends on the specimen and the objective lens.
Aperture
The stage aperture is the opening through which light passes toward the specimen. It is an opening rather than a magnifying lens, and it forms part of the microscope’s illumination pathway.
Difference Between Optical, Mechanical, and Illuminating Parts
Difference Between Optical, Mechanical, and Illuminating Parts of a Microscope
| Basis of Difference | Optical Parts | Mechanical Parts | Illuminating Parts |
|---|---|---|---|
| Meaning | Parts that magnify the specimen and help form the image. | Parts that support the microscope and help position and focus the specimen. | Parts that provide and control light for viewing the specimen. |
| Main Function | To magnify and transmit the image of the specimen. | To provide support, stability, movement, and focusing. | To illuminate the specimen and regulate light intensity and distribution. |
| Examples | Eyepiece, objective lenses. | Arm, base, stage, revolving nosepiece, coarse adjustment knob, fine adjustment knob. | Illuminator, mirror, condenser, and iris diaphragm. |
| Role in Observation | Makes small structures appear larger. | Helps position the specimen and bring it into focus. | Makes the specimen visible with suitable brightness and contrast. |
| Importance | Helps observe cells, tissues, and microorganisms in detail. | Ensures proper handling, positioning, and focusing of the specimen. | Helps produce a clear, well-illuminated image. |
How to Calculate the Total Magnification of a Microscope
The total magnification of a compound light microscope is calculated by multiplying the eyepiece magnification by the objective magnification.
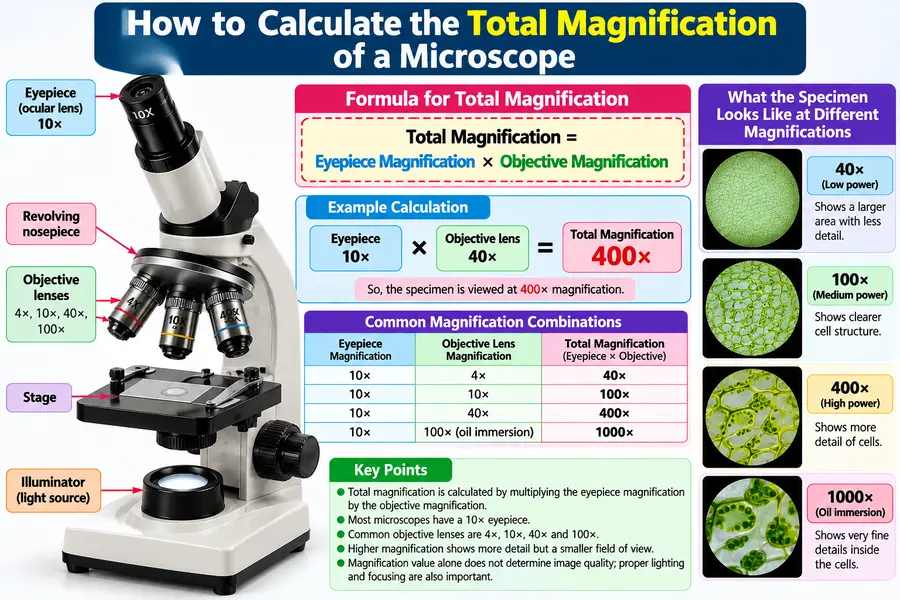
Total Magnification = Eyepiece Magnification X Objective Magnification
For example, if the eyepiece is 10× and the objective is 40×: 10 X 40 = 400X. . The specimen is therefore viewed at 400× total magnification.
How to Use a Microscope Correctly
Follow these steps when using a standard compound light microscope in a teaching or laboratory setting.
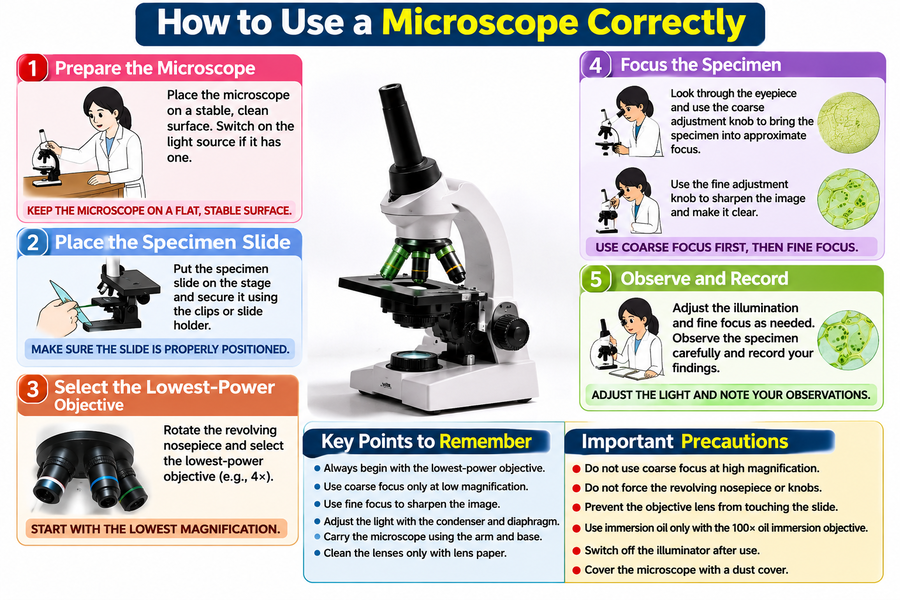
- Step 1: Prepare the microscope (Place the microscope on a stable, clean surface and switch on the light source if it has one.)
- Step 2: Place the specimen slide. (Position the slide on the stage and secure it using the clips or slide holder.)
- Step 3: Select the lowest-power objective. (Begin with the lowest-power objective to locate the specimen more easily and reduce the risk of damaging the slide.)
- Step 4: Focus the specimen. (Use the coarse adjustment carefully under low power, followed by the fine adjustment to sharpen the image.)
- Step 5: Observe and record. (Adjust the illumination and fine focus as needed. Record the structures observed and clean the instrument after use.)
Important Precautions While Using a Microscope
- Carry the microscope using both the arm and the base.
- Clean optical lenses only with appropriate lens paper.
- Start observation with the lowest-power objective.
- Never force the revolving nosepiece or adjustment knobs.
- Avoid using the coarse adjustment knob at high magnification.
- Prevent the objective lens from touching the slide or coverslip.
- Use immersion oil only with an objective specifically designed for oil immersion.
- Switch off the illuminator and cover the microscope after use.
Conclusion
Knowing the parts of a microscope and what each part does is essential for doing work in a laboratory. Each component plays a job in magnifying, focusing, moving a specimen, or lighting. Knowing how these components work together helps students, laboratory technicians, and researchers see structures clearly and use laboratory equipment safely. I find that when I understand how everything fits, my confidence grows.
Whether you are studying biology, microbiology, biotechnology, or medical laboratory science, learning about microscope anatomy is a first step toward gaining practical microscopy skills. I have seen how this knowledge opens doors to experiments.
Frequently Asked Questions (FAQs)
1. What are the main parts of a microscope?
Answer: The main parts of a standard compound light microscope include the eyepiece, objective lenses, revolving nosepiece, body tube or head, stage, stage clips, condenser, iris diaphragm, illuminator, coarse adjustment knob, fine adjustment knob, arm, and base.
2. Which part of the microscope magnifies the specimen?
Answer: The objective lens provides the primary magnification, while the eyepiece magnifies the image further for viewing.
3. What is the function of the condenser?
Answer: The condenser focuses light onto the specimen to support clear and well-illuminated viewing.
4. What is the difference between coarse and fine adjustment knobs?
Answer: The coarse adjustment knob makes larger focusing movements, while the fine adjustment knob makes small movements to sharpen the image.
5. What is the function of the diaphragm?
Answer: The iris diaphragm controls the amount and angular spread of light reaching the specimen, helping adjust contrast and illumination.
6. What is the function of the microscope stage?
Answer: The stage supports the slide and positions the specimen for observation.
7. What is the total magnification of a microscope with a 10× eyepiece and a 40× objective?
Answer: The total magnification is 10X40=400 X.
8. Which objective lens should be used first?
Answer: The lowest-power objective is generally used first because it provides a wider field of view and makes locating the specimen easier.
References
- National Council of Educational Research and Training (NCERT). Laboratory Manual: Biology, Class XI — Exercise 1: To Study Parts of a Compound Microscope.
- Microscope.com. Compound Microscope Parts and Functions.
- Microbe Online. Parts of a Microscope and Their Functions.