
Learn the steps in staining processes, including smear preparation, fixation, and staining, with clear explanations and practical examples for microbiology students.
Introduction
Staining is a key technique in microbiology for visualizing microorganisms and their cell structures using the microscope. Most bacterial cells have little natural color and are very hard to distinguish, as they are almost transparent. This problem is solved by staining, where specific dyes are used to produce contrast between the microbial cell and the surrounding background. Depending on the purpose, the shape, arrangement, size, cellular architecture, and some characteristics of microorganisms can be identified with different staining methods.
The process of staining can be likened to painting a small object in everyday life. Suppose, for example, you need to find the details of a small design on a white wall. If it’s the same color as the wall, it’s hard to see the design. But if you give the design a good color, then the shape and details are much easier to see. Bacterial cells are also hard to see because they are almost colorless. There is a staining procedure to add color and contrast so that the microbiologist can see them well.
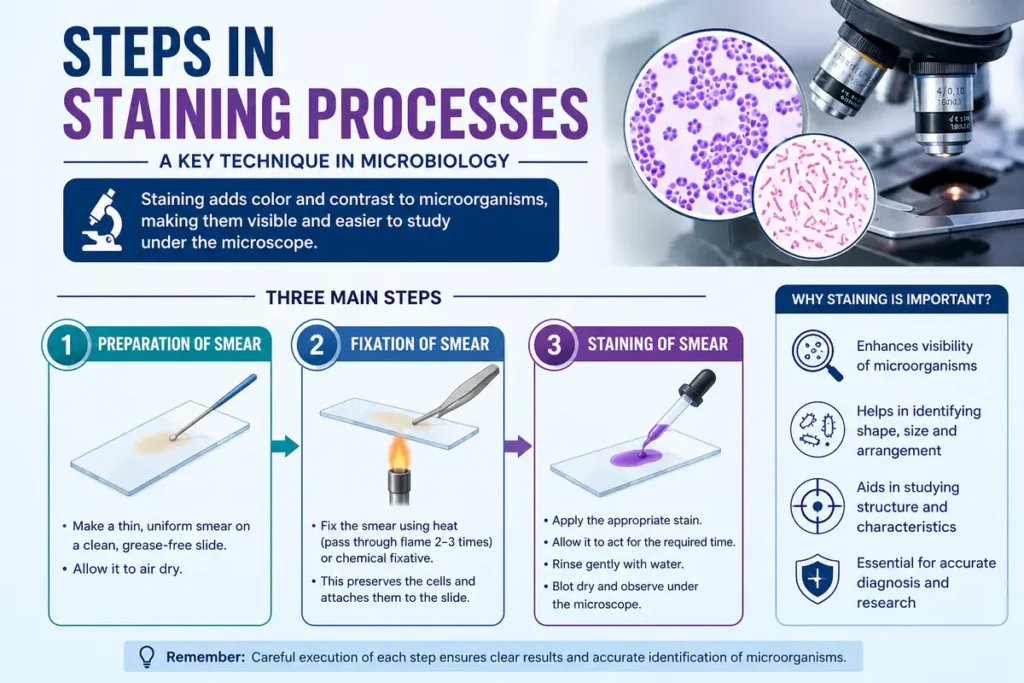
Generally, the steps in staining are preparing a smear, allowing the smear to air dry, fixing the cells, staining with the appropriate stain, removing excess or unwanted stain when necessary, and observing the stained preparation with a microscope. Each step has a purpose and has to be carried out carefully because a wrong step can affect the final look of the microorganism.
Thus, staining is not merely the addition of color but a systematic series of operations for the purpose of rendering microorganisms visible and for supplying useful information as to their properties. To be able to correctly examine and identify microorganisms under the microscope, it is important to understand each step.
Steps in staining processes
Actually, any staining procedure can be divided into three steps:
(A) Preparation of the film or smear
(B) Fixation of smear
(C) Staining of the smear which involves one or more staining solutions
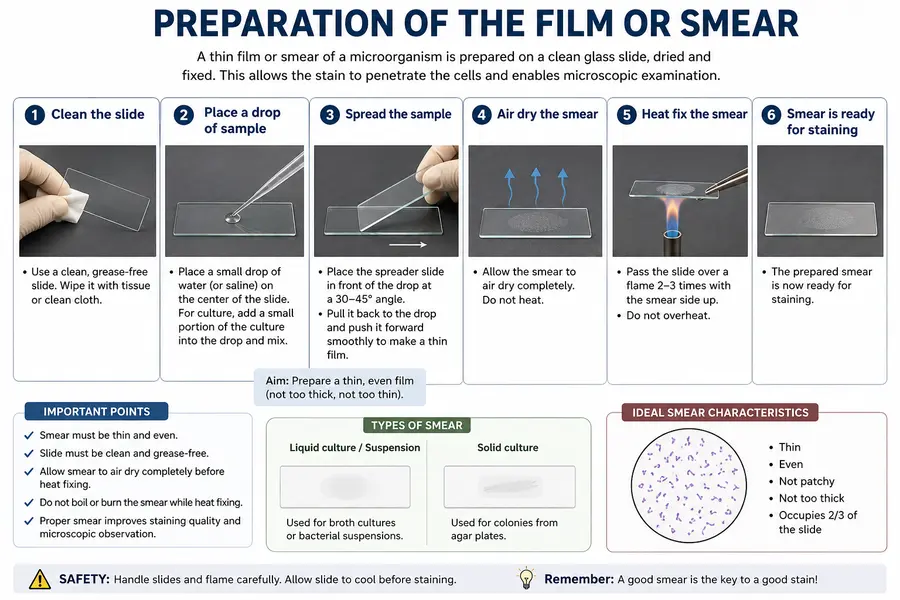
(A) Preparation of the film or smear
Smears are made on perfectly clean, grease-free glass slides (3″x1″). A smear is a thin, uniformly spread film of the fluid material present in the specified area. Or it can be prepared by placing a loop of sterile distilled water on the slide into which the growth of the organism is emulsified and spread uniformly to make a thin film layer. Allow the smear to air dry, or hasten the drying by holding the slide high over a flame.
(B) Fixation of Smear
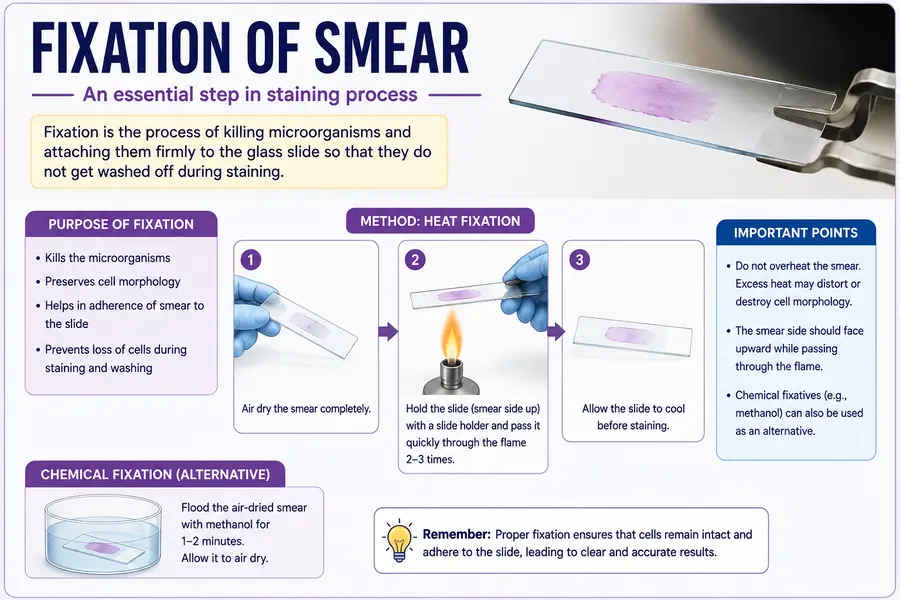
Heat is used as a physical agent for fixation of smears in most of the staining techniques. The smear is fixed by passing the slide slowly through the flame three times or by holding the slide film upwards at the top of the Bunsen flame for a few seconds so that the slide becomes hot. Care should be taken to avoid charring the film.
Chemical agents are agents of fixing. For instance,
(i) Feulgen’s and Giemsa’s nuclear material staining techniques both employ Bouin’s fixative.
(ii) Both Fontana’s and Becker’s methods for spirochaete stain use Fontana’s fixative.
“Fixatives” are physical or chemical substances that immobilize organisms and their structures; “fixation” is the name for the process. Denaturation of proteins and solidification of cell structures cause fixation. Physical agent heat is the most popular approach. When heat causes damage to cells, chemicals such as acids, alcohols, heavy metals, salts, and oxidizing agents like formalin, chromic acid, picric acid, mercuric chloride, ethanol, chloroform, etc. can be utilized as fixatives.
Before staining, fixation is a crucial step since it
(1) eliminates the microorganisms, a helpful defense against infections;
(2) makes cells more permeable to a variety of colors,
(3) results in globular proteins unfolding, which raises the affinity for stain by increasing the reactive groups;
(4) prevents some areas of the cell from shrinking and enlarging;
(5) stops the cell from autolyzing;
(6) shields the structures from staining reagent solubility;
(7) stiffens the cell material;
(8) prevents artifacts from forming.
Fixatives are chosen based on the requirements of a specific staining process and the goal of the study because no single fixative will meet all of the aforementioned requirements.
(C) Film or smear staining
Following fixation, the smear is dyed in accordance with the experiment’s goal.
Conclusion
A key method in microbiology is staining, which turns almost undetectable microbes into structures that are easily seen under a microscope. Staining is more than just applying a dye; it’s a methodical process that includes smear preparation, fixation, and staining, all of which improve the quality and precision of microscopic observation.
While fixation aids in maintaining the cellular structure and securely adhering the bacteria to the slide, proper smear preparation guaranties that germs are uniformly spread in a thin layer. Studying the morphology, arrangement, and particular traits of microorganisms is made possible by the final staining phase, which supplies the required color and contrast.
Staining exposes microbial cells and their structures for microscopic inspection, much how highlighting significant information in a paper makes it simpler to identify. For a staining outcome that is clear, dependable, and significant, each stage must be carefully carried out. The basis for using more sophisticated staining techniques like Gram staining, acid-fast staining, and unique staining methods is a solid grasp of these fundamental procedures.
FAQs
1. What are the steps for staining?
Answer: Preparation of the smear – Make a thin, uniform film of the specimen on a clean glass slide and allow it to dry.
Fixation of the smear – Fix the smear using heat or a suitable chemical fixative.
Staining of the smear – Apply the appropriate stain according to the purpose of the experiment.
2. What to apply before staining?
Answer: Before staining, a clean, grease-free glass slide is used, and the smear is prepared and fixed.
3. How many steps are there in simple staining?
Answer: Simple staining generally involves 3 main steps:
Prepare the smear
Fix the smear
Apply the stain and observe under the microscope.
4. How to apply stain to steps?
Answer: Steps to apply stain:
Cover the fixed smear with the stain.
Allow it to act for the recommended time.
Wash gently with water.
Blot dry and observe under the microscope.
5. What are common staining mistakes?
Answer: Common Staining Mistakes:
Using a dirty or greasy slide
Making a smear that is too thick
Overheating during fixation
Over- or under-staining
Excessive washing or decolorization
Not allowing the smear to dry properly
Using contaminated reagents or equipment
References
- Cappuccino, J. G., & Welsh, C. T. (2017). Microbiology: A Laboratory Manual (11th ed.). Pearson.
- Leboffe, M. J., & Pierce, B. E. (2021). A Photographic Atlas for the Microbiology Laboratory (5th ed.). Morton Publishing Company.
- Madigan, M. T., Bender, K. S., Buckley, D. H., Sattley, W. M., & Stahl, D. A. (2021). Brock Biology of Microorganisms (16th ed.). Pearson.
- Tille, P. (2021). Bailey & Scott’s Diagnostic Microbiology (15th ed.). Elsevier.
- Prescott, L. M., Harley, J. P., & Klein, D. A. (2002). Microbiology (5th ed.). McGraw-Hill.
- OpenStax. Microbiology – 3.1 Staining. OpenStax, Rice University. OpenStax Microbiology
- Microbiology Society. Resources and educational materials on microbiological techniques and staining. Microbiology SocietyMicrobiology Society